The VERY IMPORTANT First bit
This page is a record of how I converted parts of a Minolta scanner myself. It is NOT intended to be a tutorial for other people to do the same thing. Modifying parts like this invalidates warranties and although the modified parts work now, future software or firmware updates may not be so accommodating. If as a result of reading this record you attempt to copy what I’ve done I can’t be held any way responsible for any damage or losses you may incur.
DON’T BLAME ME IF IT ALL GOES WRONG! OK?
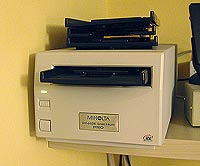
The Scanner Minolta’s Dimage Scan Multi Pro film scanner is a wonderful bit of kit for the digital darkroom offering some of the best performance for film scanning of any desktop film scanner. One of it’s key advantages is that it is capable of making scans the width of 35mm at 4800dpi for 9cm as a result of it’s medium format capability. This has meant that it ought to be the best solution available for scanning images taken on 35mm panoramic cameras that deliver wider than normal frames. Cameras like the Noblex 135 series and Hasselblad X Pan cameras both deliver frames 65mm long, wider than virtually any 35mm scanner can handle as standard. It looked ideal for us panoramic enthusiasts. |
 |
The Problem Whilst the Scan Multi Pro is capable of scanning the area of a 35mm panoramic negative at 4800 dpi in one pass the only provision for holding that negative in the scanner as provided is the medium format glass carrier. This carrier has three problems when in use for scanning 35mm panoramic negatives. Firstly, it is difficult to place the film centrally on the glass, meaning time consuming work levelling the image in software at a later stage. Secondly, using the glass carrier there are three times as many surfaces that collect dust. This makes far more work for the dust removal function of the driver’s software and often seems to leave unwanted artefacts in the final image. When scanning some films, e.g. black and white silver based films, the option of automatic dust removal in software isn’t available anyway. Finally, if unlucky through environmental humidity, Newton’s rings patterning can become a serious problem. Minolta do make a "Multi format set" for scanning unusual format film, but it is reported to be awkward to use and still has the drawback of still using glass to keep the film flat. It uses the same medium format carrier that is supplied with the scanner, but the kit includes an additional insert for multi format use. It’s also very expensive. What’s needed is a glassless carrier just for panoramic film. |
|
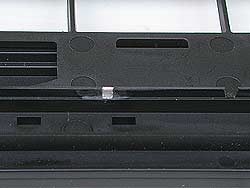
The Plan Courtesy of someone on the Multipro users list I discovered that it was possible to buy spare 35mm film carriers for a modest amount(Ł35 in the UK) as spare parts from Minolta. I resolved to get one and attempt to modify it to use for scanning my panoramic films. Having used the scanner a while it was apparent that it wasn’t possible to "over scan" the supplied glassless carrier, so simply removing a separating bar wouldn’t be enough to make a glassless carrier. The scanner was sensing which carrier was fitted and only allowing certain areas to be scanned dependant on the carrier inserted. I started off by carefully studying all three of the supplied negative carriers and the scanner itself. It became apparent that the scanner was detecting the carrier and positioning it with the use of two optical sensors. These are fitted on the right hand side of the scanning area as you look into the scanner through the front carrier door. They look at a moulded strip that runs along the base of the carrier that has different lengths and cut outs on each of the supplied carriers. After much thought and consideration it seemed that the best plan would be to try to modify the new carrier so that the scanner would detect it as a medium format carrier and allow 4800 dpi scanning of just one area. |
|
The Risks Modifying parts to make equipment do something it wasn’t designed to will always carry a risk. It is possible that the modified part may not work as expected and may damage the equipment and wouldn’t be covered by it’s warranty. |
|
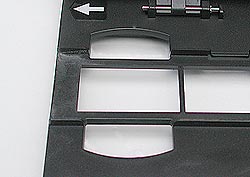
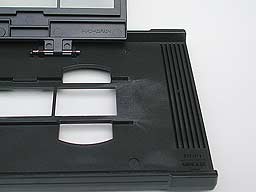
The Graft Having finished the hard part of the conversion, deciding what to actually modify, I just had to engineer the modifications I thought necessary. The first part was relatively simple. The dividing bar between frames 4 and 5 of the carrier was careful sawn out with a very fine toothed saw close to the edge of the carrier. The stumps left where then carefully filed down until flush with the existing frame edges using progressively finer files and finally finishing off with 600 grade wet and dry abrasive paper. Care was taken to ensure no rough edges were left at any of the places material was removed throughout the modification. The second thing to deal with were the end stops of the film carrier. I started by starting to remove most of the material with a sharp craft knife, but stopped just before the base level of the carrier. The final material was removed using a small end cutting bit* mounted in a drill press to mill the base flat. When flush the area was finished with 600 grade wet and dry abrasive paper to ensure there were no sharp edges to damage the film surface. Next I turned my attention to modifying the moulded rib under the carrier. The final part of the conversion was removing excess parts of the rib no longer needed. I started by removing all of the rib beyond the end of frame 5 to limit the carrier’s travel and then cut four notches in the rib to match the medium format carrier’s rib. Most of the material was roughly removed with a sharp craft knife and the bases were levelled using the fine end cutting drill bit in the drill press again. Once everything was finished everything was very carefully inspected for any rough edges and finished with 600 grade wet and dry abrasive paper. Then the entire carrier was cleaned very carefully with a soft brush to remove any dust or abrasive particles and finally blown over with compressed air. |
|
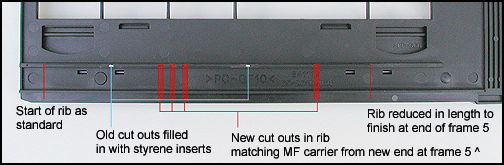 Detail of modifications to rib on underside of carrier.
 The underside of the finished carrier prior to painting the white styrene inserts. | |
The end result When finished I booted up the scanner and fed the modified carrier in. It went straight in without any problems or odd noises and works perfectly. The film seems to be held flat enough not to detect any unsharpness in the image. This was expected as medium format glassless carrier seem to perform perfectly acceptably and with the narrower width of the 35mm film it ought to be held more securely anyway. |
|
A Final word Now maybe Minolta could offer something like this. It might even be possible to have the scanner move the carrier from frame to frame too, which make life even easier. However I think the market is probably too small for them to make that investment. It would have been nice if Minolta had replied to my emails asking for assistance in making this conversion, but hopefully they've been too busy upgrading their driver software to have the time to help me. If anyone from Minolta does come across this page, please let me know what you think of what I've done. If anyone has found this page interesting and is tempted to have a go at a similar conversion or has any more detailed queries about what I've done or has some suggestions for improving the conversion. PLEASE send me a comment via the button on the bottom of the page.If you have a look at the rest of the site you'll find several examples of my panoramic photography. The latest images scanned by the Minolta are on the Jubilee Line portfolio. Now scanning panoramic negatives is so much easier I hope to have some new panoramic work to go onto the web in a month or two, please come back and let me know what you think it. Finally, thanks are due to Bill Wilkins of WebPro.ch for his assistance and encouragement on this project. Paul Holman |
|
 | |
Notes * I bought much of my supplies from a local model/craft shop.The end cutting mill bit was an accessory cutter for a hand held drilling system made by Dremel. The styrene sheet is used for making model trains, boats and suchlike. I think the sheet thickness I used was .020" but it’s very cheap and available in packs of several thickness. Methyl Ethyl Ketone is a solvent used to cement Styrene sheet and assemble plastic model kits. It needs careful application with a fine soft brush and "welds" the components together by dissolving the plastics together. Matt black enamel paint, again meant for model makers. |
|